Getting Started
Running Locally
Glow requires Apache Spark 3.4, 3.5, or 4.1.
On Spark 3.x, use the Scala 2.12 artifact
io.projectglow:glow-spark3_2.12.On Spark 4.1 (Scala 2.13, Java 17), use
io.projectglow:glow-spark4_2.13. Please read Known limitations on Spark 4 before running on Spark 4.
If you don’t have a local Apache Spark installation, you can install it from PyPI:
pip install pyspark==3.5.0
or download a specific distribution.
Install the Python frontend from pip:
pip install glow.py
and then start the Spark shell with the Glow maven package:
./bin/pyspark --packages io.projectglow:glow-spark3_2.12:2.0.3 --conf spark.hadoop.io.compression.codecs=io.projectglow.sql.util.BGZFCodec
To start a Jupyter notebook instead of a shell:
PYSPARK_DRIVER_PYTHON=jupyter PYSPARK_DRIVER_PYTHON_OPTS=notebook ./bin/pyspark --packages io.projectglow:glow-spark3_2.12:2.0.3 --conf spark.hadoop.io.compression.codecs=io.projectglow.sql.util.BGZFCodec
And now your notebook is glowing! To access the Glow functions, you need to register them with the Spark session.
import glow
spark = glow.register(spark)
df = spark.read.format('vcf').load(path)
If you don’t have a local Apache Spark installation, download a specific distribution.
Start the Spark shell with the Glow maven package:
./bin/spark-shell --packages io.projectglow:glow-spark3_2.12:2.0.3 --conf spark.hadoop.io.compression.codecs=io.projectglow.sql.util.BGZFCodec
To access the Glow functions, you need to register them with the Spark session.
import io.projectglow.Glow
val sess = Glow.register(spark)
val df = sess.read.format("vcf").load(path)
Known limitations on Spark 4
Spark 4 enables ANSI SQL mode by default (spark.sql.ansi.enabled=true), whereas Spark 3
defaulted it to false. Under ANSI mode, operations such as numeric casts that overflow,
out-of-range array indexing, and division by zero raise an error instead of returning
null.
A small number of Glow expressions currently rely on the non-ANSI (return-null) behavior and
will throw under Spark 4’s default configuration:
hardy_weinberg/ thecombhelper (combinatorial term) — casts aDoubletoLongthat can overflow for large cohort or allele counts.array_quantile— casts a quantile index toInt(can beNaN/Infinity) and indexes into the input array (can be out of bounds for empty arrays).
Both live in core/src/main/scala/io/projectglow/sql/expressions/glueExpressions.scala.
Until these expressions are rewritten to be ANSI-safe (using try_cast / try_element_at /
try_divide or explicit guards — tracked in
projectglow/glow#808), if you hit an
ANSI-related error on Spark 4 you can opt back into Spark 3 semantics for the affected query
by setting:
spark.conf.set("spark.sql.ansi.enabled", "false")
All other Glow functionality has been validated on Spark 4.1 with ANSI mode at its default.
Getting started on Databricks
Databricks makes it simple to run Glow on Amazon Web Services (AWS), Microsoft Azure, and Google Cloud Platform (GCP).
You can install the Glow Scala and Python artifacts as Maven and PyPI cluster libraries.
After you’ve set up a cluster and installed Glow, you can follow these steps to see how it works:
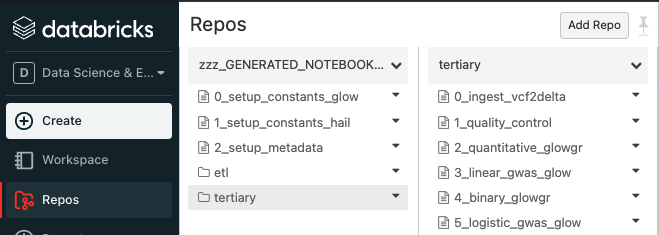
Sync the Glow notebooks via Repos
Fork the Glow github repo.
Clone your fork to your Databricks workspace using Repos (step-by-step guide).
The notebooks are located under
docs/source/_static.
Create automated jobs
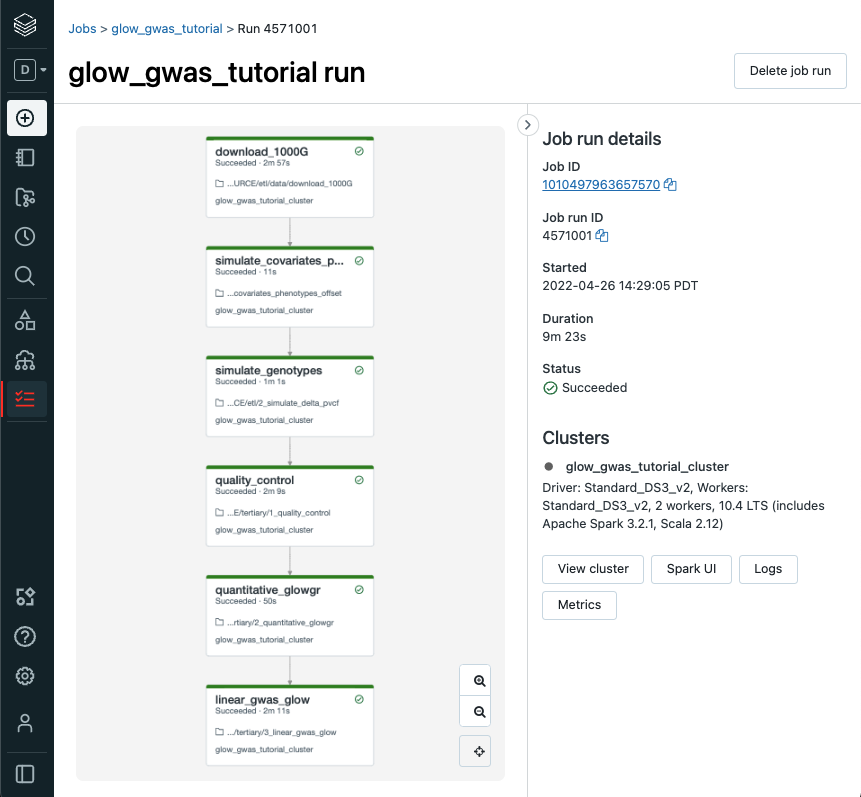
To build an automated Glow workflow in your Databricks workspace, please follow these steps, which simulate data and then run the Glow GWAS tutorial
Configure the Databricks CLI, authenticating via Databricks personal access token (docs).
Create a directory in your Databricks workspace,
databricks workspace mkdirs /Repos/test
Import source files from your fork of the Glow Github repository to this directory using repos,
databricks repos create --url https://github.com/<github_profile>/glow --provider gitHub --path /Repos/test/glow
Switch to the branch of Glow that you are working on using repos,
databricks repos update --branch master --path /Repos/test/glow
Create a workflow using jobs,
Azure GWAS tutorial
databricks jobs create --json-file docs/dev/glow-gwas-tutorial-azure.json
AWS GWAS tutorial
databricks jobs create --json-file docs/dev/glow-gwas-tutorial-aws.json
Take the job id that is returned, and run the job,
databricks jobs run-now --job-id <job id>
Go to the Databricks web application and view the output of the job,
Epilogue
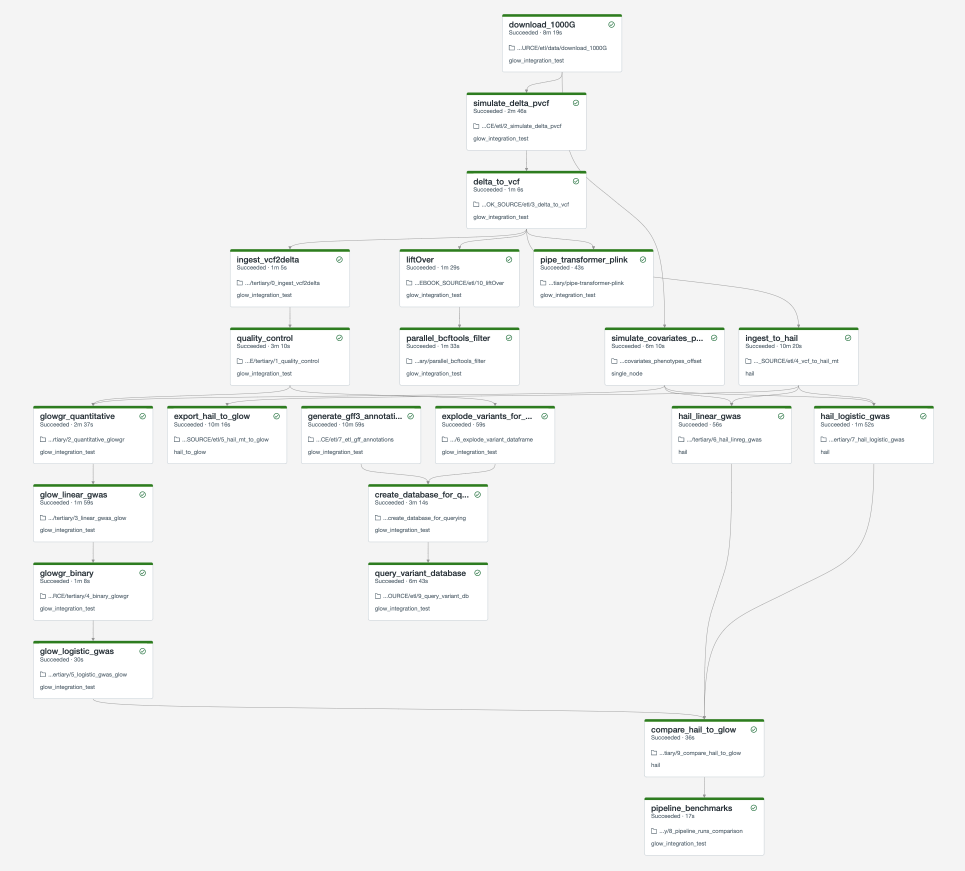
The full set of notebooks in Glow undergo nightly integration testing orchestrated by CircleCI (example output) using the latest version of the Glow Docker container on Databricks. CircleCI kicks off these notebooks from the Databricks command line interface (CLI) via a python script, which contains the above steps. The workflow is defined in this configuration json template. And the output is shown below. You can adapt these as you build your own production jobs.
Important
These notebooks must be run in order!
As you build out your pipelines please consider the following points,
Important
Start small. Experiment on individual variants, samples or chromosomes.
Steps in your pipeline might require different cluster configurations.
Tip
Use compute-optimized virtual machines to read variant data from cloud object stores.
Use Delta Cache accelerated virtual machines to query variant data.
Use memory-optimized virtual machines for genetic association studies.
The Glow Pipe Transformer supports parallelization of deep learning tools that run on GPUs.
Notebooks embedded in the docs
Documentation pages are accompanied by embedded notebook examples. Most code in these notebooks can be run on Spark and Glow alone, but functions such as display() or dbutils() are only available on Databricks. See Databricks notebooks for more info.
These notebooks are located in the Glow github repository here and are tested nightly end-to-end. They include notebooks to define constants such as the number of samples to simulate and the output paths for each step in the pipeline. Notebooks that define constants are %run at the start of each notebook in the documentation. Please see Data Simulation to get started.